BUILD AN APPROVAL PROCESS FOR ENDPOINT MANAGER APPS USING AZURE IDENTITY GOVERNANCE

Ever wanted to create an approval process for your Windows applications in Endpoint Manager? Some apps require approval as they generate licensing cost at the back end. Sure, you can use many solutions for that like Power Platform (Preferred if you’re not using Identity Governance), Active Roles Server, ServiceNow and more – you name it.

But actually there is a “built-in” solution for that. Not built in with MEM but built in with Azure and Identity Governance. If you’re licensed to use Identity Governance and you use it for services such as Privileged Identity Management (PIM) or Access Reviews your good to go. If not, you first have to onboard it. For the solution here, you need at least an Azure AD Premium P2 license or EMS E5/A5 as user.

In a first step create an application within MEM. Go to the MEM Portal https://endpoint.microsoft.com and select Apps, for example create a line-of-business app using a simple MSI. I have downloaded the latest MIP (AIP) client and uploaded it to Intune without any special configuration or silent install commands (for now).

In a second step, create a group with no user assignment and assign the group to the application created before . This could be an AD synced group or a cloud group. Still nothing special here.

Now the interesting part starts!
Browse to Identity Governance in the Azure Portal / Azure Active Directory and start creating a new Access Package using Entitlement Mangement.

From the Basics settings provide a proper name and description, such as “APP – MIP Client (requires approval)”. This name will also be populated to your end-users (also the description).

Under Resource role select + Groups and Teams and browse for the group you have created earlier. In my case mem-app-u-mip-client. Don’t forget to select also the role the user will have within this group. Usually this is just the “Member” role.

On the Request page you will have 3 options you can select. In the case here, we will use For users in your directory and All members (excluding guests). This does guest users not allow to see or request this particular access package.

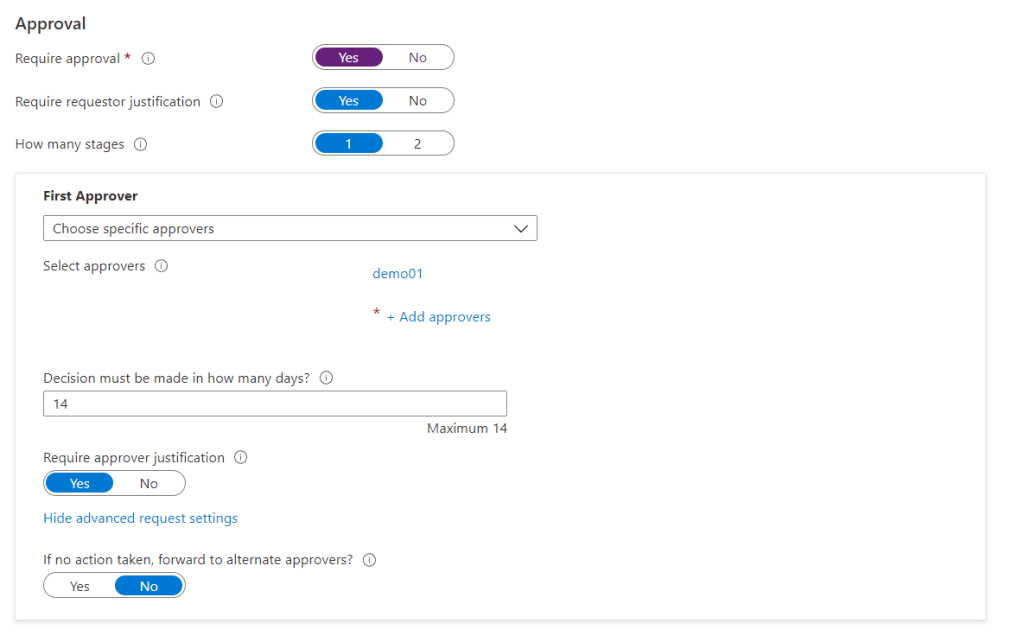
Enable the Require approval toggle to Yes. This will give you the options to configure the Approval flow. I have selected the following options, but of course your free to change them:
– Require requestor justification: Yes
– How many stages: 1
– First approver: “my demo user”
– Decision in days: 14 (default)
– Require approver justification: Yes
– If no action taken, forward to alternate approvers?: No (advanced request)
– Enable: Yes

Under Requestor information (preview) you have the option to define some specific questions for the requester of the package. For example, you can request to provide some more information about the reason of the usage of this particular app with some multiple choise values.

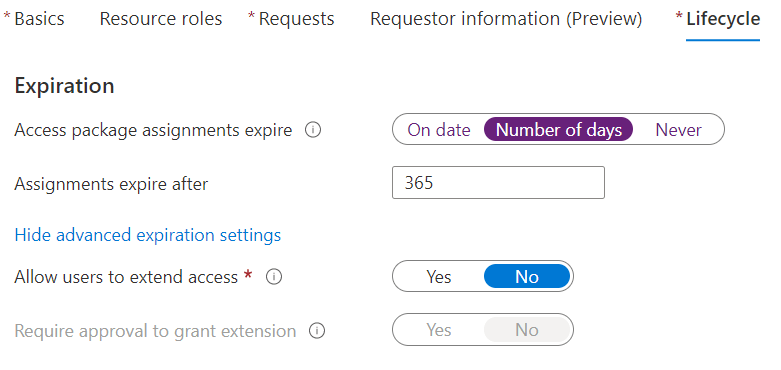
Within the Lifecycle options we can now define the time of availability of the Acccess Package itself. Let’s say, this access package is only available for the rollout of our MIP Client and we like to define a timeframe of 1 year (365 days) of availability (this is just a random pick) and we do not allow to extend access to the package.

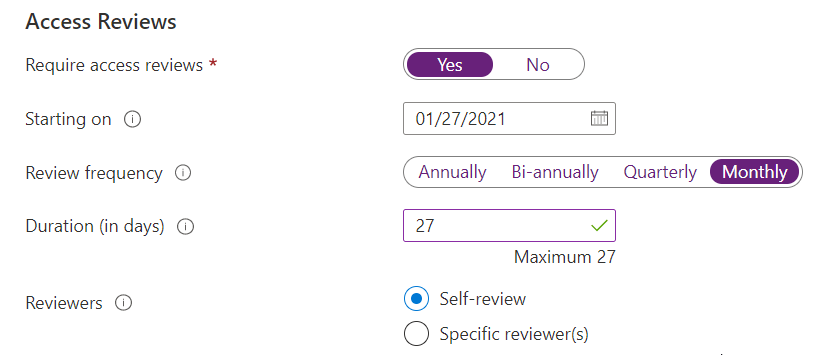
As next we would also like to enable the Access Review of the package and check back within a couple of month who has access and if this access is still needed (Review of access to our Intune deployed application). The Reviewers could be a specific user (Application Owner for example) or a Self-review where the user has to review the access by himself. Choose the values they fit as its best to your use case.

Review and create your Access Package. This will populate a my access link myaccess.microsoft.com followed by your tenant name and the OpjectId of your Access package. This site is where all the packages and access reviews can be found, ether for the end user to request the package (application) or to review as an application owner.

Enduser experience

Your users are now able to browse to your organization myaccess site by browsing the URL https://myaccess.microsoft.com/ To request the application they select Access package, where our just created package APP – MIP Client (Require approval) will be listed. The request is super easy. The requester has to select + Request access – provide the required information such as the Business reason & justification (if configured within the package) and then to submit the request. During the request process, the user has the opportunity to see the current status of the request including the approval process under his Request history.

Approver experience

The configured approver of the package (which could also be the Manager, currently in Preview) will receive an email to approve or deny the request. As soon the access has been granted, the user account will be added to our created group and the user will receive the assigned application ether to install the application by himself using the Company Portal or if the assignment is set to required within MEM, the application will be forced to install.

Depending on the configured Access review time, the reviewer will receive a similar email to review the access. This could be Self-service for the user or another person within your organization.

Hope this helps to use Access package as your approval process for MEM deployed Windows applications. Let me know what you think! Stay save.

MIGRATE AZURE AD CONNECT TO ANOTHER SERVER – CONSIDER “SOURCE ANCHOR”

Sometimes it’s required to migrate your Azure AD Connect to a new OS or another server. This is actually a straight forward thing and you can find severeal blogs to do that – just google it. But one thing you should keep in mind is the SourceAnchor immutable attribute. Immutable means “not changeable”.

Since this attribute’s value cannot be changed after it has been set, it is important to pick a design that supports your scenario. Consider this, check the docs site for more information.

The change to another server requires Azure AD connect to be installed in staging mode. Staging mode enables you a “Hot standby” Azure AD Connect server and allows you to migrate from the original server to the new one or in case of a server failure to switch over.

During the installtion of the staging server, Azure AD Connect wizard checks the SourceAnchor attribute. Since version 1.1.524.0 of AADC, the attribute ms-DS-ConsistencyGuid is used as the primary source anchor instead of the objectGUID attribute. AADC checks the ms-DS-ConsistencyGuid within the forest and in case the attribute is not used by any service, an automatic migration will take place.

Now when you move to a new server, Azure AD Connect will drop an error, that the attribute ms-DS-ConsistencyGuid has already values and instead objectGUID will be used as the source anchor. If you ignore this, you will run in trouble for sure! So be careful.

SOLUTION
If you are certain that the attribute isn’t used by other existing applications, you can suppress the error by restarting the Azure AD Connect wizard with the /SkipLdapSearch switch specified. 

"c:\Program Files\Microsoft Azure Active Directory Connect\AzureADConnect.exe" /SkipLdapSearch

SkipLdapSearch allows you to change the staging mode server to the sourceAnchor attribute ms-DS-ConsistencyGuid.

Make sure all your settings are identically configured on the staging server compared to the source server before you switch to the new installed box.

Happy sourceAnchor-ing!

Configure Device Registration with Azure AD Connect

Azure AD Connect is a great tool to On-board your On-Premise Identities to the Azure Cloud. If you like to use a Hybrid Join of your Windows 10 Devices – Local Domain join & Azure AD join – you can configure Device Registration. What is the benefit if you enable this option?

PREPARE

Since a few version back of Azure AD Connect it allows you to use the wizard to configure the necessary options for you. First of all, make sure you use the latest version of Azure AD Connect. You can also check the Auto-Upgrade Option of the engine by using the PowerShell command on the server where AAD Connect is installed:

Get-ADSyncAutoUpgrade
Further information can found here.

CONFIGURE AZURE AD CONNECT

Run Azure AD Connect – Configure – and select “Configure device options”

2018-08-15 19_29_00-Window

On the “Overview” page click Next.
On the “Connect to Azure” page enter your Global Admin credentials and click Next.
On the “Device options” page select “Configure Hybrid Azure AD Join” and click Next.

2018-08-16 12_57_27-192.168.1.4 - Remote Desktop Connection

On the next step you will configure the Service Connection Point (SCP) to help your Windows 10 devices to find the necessary Azure Tenant information’s. To configure the SCP you need to provide Enterprise Admin Credentials. If you cannot provide this credentials during the wizard, you will be able to download the script to set the SCP in a later phase or offline.

2018-08-16 13_01_08-192.168.1.4 - Remote Desktop Connection

This step helps you also to verify your current configuration. AAD Connect is checking the configured configuration on your AD. You can manually to that by browsing your ADSI Editor. Connect to the configuration naming context and then load the CN:   “CN=ms-DS-Device-Registration-Service,CN=Schema,CN=Configuration,DC=xy,DC=xy”

2018-08-16 13_16_52-192.168.1.4 - Remote Desktop Connection

Back to the wizard, provide the Enterprise Admin credentials and click “Next”.

2018-08-16 13_09_18-192.168.1.4 - Remote Desktop Connection

Device Registration is also supported for Windows Downlevel Devices, like Windows 10 prior 1607 build, Windows 8.1, 8 & 7. For further information regarding downlevel devices visit the docs.microsoft.com page.

2018-08-16 13_10_51-192.168.1.4 - Remote Desktop Connection

This will configure the Device Registration for a Hybrid Join. Click configure.

2018-08-16 13_14_01-192.168.1.4 - Remote Desktop Connection

This will complete your On-Prem configuration for Device Registration.

2018-08-16 13_43_25-192.168.1.4 - Remote Desktop Connection

POST CONFIGURATION TASKS

https://docs.microsoft.com/de-ch/azure/active-directory/connect/active-directory-azure-ad-connect-hybrid-azure-ad-join-post-config-tasks

Check out point 10 on the post tasks. You should create a GPO to make sure your devices getting Hybrid joined in Azure:

  • Create a new GPO and Name it
  • Computer Configuration > Policies > Administrative Templates > Windows Components > Device Registration
  • Select : Register domain-joined computers as devices
  • OK
  • Link the policy to your Windows 10 Devices


Step-by-step configuring Enterprise State Roaming (ESR) with Azure AD Connect Password sync

During the last couple of month, we had a lot of discussions with our customers regarding the new modern way to roam user settings. I’m sure that you agree with me, that roaming profiles are a legacy way to do this.

Microsoft introduced Enterprise State Roaming a while ago. First a consumer version was available when Windows 8 was released. Microsoft accounts did roam user settings to the cloud. Settings like Wi-Fi Profiles, Internet Explorer Settings and Start menu configurations where roamed.

With ESR you can now roam settings to Azure in a professional enterprise way. Some prerequisites are necessary when you would use Domain Joined Devices to roaming user settings:

  • Licensing: Azure AD Premium Plan / or EM&S Licenses
  • Azure AD Connect latest version
  • Device Write back activated in Azure AD Connect
  • Password sync enabled in Azure AD Connect
  • ESR enabled on the Azure Tenant
  • Windows 10 Enterprise 1607 / Windows Server 2016
  • Domain Joined Devices

2017-02-07-08_04_21-s2021-dc

Let’s have a look at the implementation steps:

Step 1: Get Licenses

The first step is to activate a trial license of an Azure AD Premium plan. You can use an Azure AD P1 or P2 or even an EM&S. EM&S is not available for trial. For large enterprises contact your CSP to assign you some EM&S trial licenses to your tenant. Without an active plan, you won’t be able to enable ESR on Azure.

Step 2: Enable ESR on the Azure AD tenant

Go to your old Azure portal (manage.windowsazure.com) and login as a global admin. Under your directory select “CONFIGURE” and navigate to “devices”. “Enable the Users may sync settings and enterprise app data” option. You can select an Azure AD Group or allow ALL users to sync settings.
1-active-directory-microsoft-azure-and-4-more-pages-%e2%80%8e-microsoft-edge

Step 3: Configure your local AD

During the setup, you need to configure device write back in your On-Prem Active Directory. Use the PowerShell scripts bellow to enable device writeback:

Import-Module -Name "C:\Program Files\Microsoft Azure Active Directory\Connect\AdPrep\AdSyncPrep.psm1"

$ aadAdminCred = Get-Credential

Initialize-ADSyncDomainJoinedComputerSync AdConnectorAccount [connector account name] -AzaadAdminCred;ureADCredentials $

When you run $aadAdminCred = Get-Credential, you are required to type a user name. For the user name, use the following format: user@example.com

When you run the Initialize-ADSyncDomainJoinedComputerSync cmdlet, replace [connector account name] with the domain account that’s used in the Active Directory connector account. This is based on the MS article here.

Step 4: Register your devices

I’m not covering the part when you use AD FS. This is a different way to do this and you will need to setup some clame rules on your AD FS Servers. Please follow the steps in the above link under step 3.

In a no federated scenario you need some requirement do have a device registered automatically:

  • You are either running Windows 10 and Windows Server 2016 on your device
  • Your devices are domain-joined
  • Password sync using Azure AD Connect is enabled

If all of these requirements are satisfied, you don’t have to do anything to get your devices registered.

Registerd devices appearing after that in you on-Prem AD under the root\RegisteredDevices. Make sure you have Device Wirteback enabled on your Azure AD Connect configuration.

2017-02-06-15_59_38-s2021-dc

Step 5: Create a Group Policy object to control the rollout of automatic registration

To control the rollout of automatic registration of domain-joined computers with Azure AD, you have to deploy the Register domain-joined computers as devices Group Policy to the computers you want to register.

GPO to enable: Computer Configuration > Policies > Administrative Templates > Windows Components > Device Registration. Right-click Register domain joined computers as devices and “Enable” the policy.

2017-02-06-16_05_30-s2021-dc

During a reboot or a user’s sign in to Windows the device will be registered to Azure and written back to the On-Prem Active directory. You will not be able to see the device name in the dsa.msc. For that launch the Active Directory Administrative Center where you have an additional row of the devices “Display name”.

2017-02-06-16_13_01-s2021-dc

Step 6: Usage

When a user now logs in to his domain joined (or Azure AD joined)  Windows 10 machine using his UPN, the user account is added to the users profile and visible under Settings – Accounts – Email & App accounts as a Work Account.

2017-02-06-16_20_05-hwa10001

The user sync setting is enabled by default and users can change this options. Under Settings – Accounts – Sync your settings you will also recognize that the users UPN is used to sync all the settings.

2017-02-07-07_51_20-hwa10001

Conclusion::

Try it out! You will recognize that settings are changed immediately. For example, change the wallpaper, the taskbar position or even Internet Explorer favorites. This is a great feature for roam user settings across enterprise devices. The next step will be to use conditional access for those users:

https://docs.microsoft.com/en-us/azure/active-directory/active-directory-conditional-access