During the last couple of month, we had a lot of discussions with our customers regarding the new modern way to roam user settings. I’m sure that you agree with me, that roaming profiles are a legacy way to do this.
Microsoft introduced Enterprise State Roaming a while ago. First a consumer version was available when Windows 8 was released. Microsoft accounts did roam user settings to the cloud. Settings like Wi-Fi Profiles, Internet Explorer Settings and Start menu configurations where roamed.
With ESR you can now roam settings to Azure in a professional enterprise way. Some prerequisites are necessary when you would use Domain Joined Devices to roaming user settings:
- Licensing: Azure AD Premium Plan / or EM&S Licenses
- Azure AD Connect latest version
- Device Write back activated in Azure AD Connect
- Password sync enabled in Azure AD Connect
- ESR enabled on the Azure Tenant
- Windows 10 Enterprise 1607 / Windows Server 2016
- Domain Joined Devices

Let’s have a look at the implementation steps:
Step 1: Get Licenses
The first step is to activate a trial license of an Azure AD Premium plan. You can use an Azure AD P1 or P2 or even an EM&S. EM&S is not available for trial. For large enterprises contact your CSP to assign you some EM&S trial licenses to your tenant. Without an active plan, you won’t be able to enable ESR on Azure.
Step 2: Enable ESR on the Azure AD tenant
Go to your old Azure portal (manage.windowsazure.com) and login as a global admin. Under your directory select “CONFIGURE” and navigate to “devices”. “Enable the Users may sync settings and enterprise app data” option. You can select an Azure AD Group or allow ALL users to sync settings.

Step 3: Configure your local AD
During the setup, you need to configure device write back in your On-Prem Active Directory. Use the PowerShell scripts bellow to enable device writeback:
Import-Module -Name "C:\Program Files\Microsoft Azure Active Directory\Connect\AdPrep\AdSyncPrep.psm1"

$ aadAdminCred = Get-Credential

Initialize-ADSyncDomainJoinedComputerSync –AdConnectorAccount [connector account name] -AzaadAdminCred;ureADCredentials $
When you run $aadAdminCred = Get-Credential, you are required to type a user name. For the user name, use the following format: user@example.com
When you run the Initialize-ADSyncDomainJoinedComputerSync cmdlet, replace [connector account name] with the domain account that’s used in the Active Directory connector account. This is based on the MS article here.
Step 4: Register your devices
I’m not covering the part when you use AD FS. This is a different way to do this and you will need to setup some clame rules on your AD FS Servers. Please follow the steps in the above link under step 3.
In a no federated scenario you need some requirement do have a device registered automatically:
- You are either running Windows 10 and Windows Server 2016 on your device
- Your devices are domain-joined
- Password sync using Azure AD Connect is enabled
If all of these requirements are satisfied, you don’t have to do anything to get your devices registered.
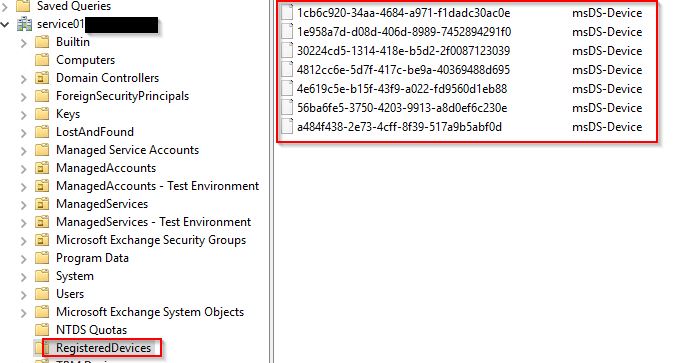
Registerd devices appearing after that in you on-Prem AD under the root\RegisteredDevices. Make sure you have Device Wirteback enabled on your Azure AD Connect configuration.
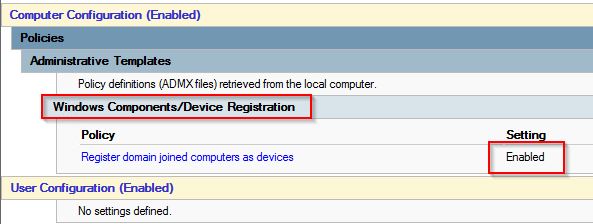
Step 5: Create a Group Policy object to control the rollout of automatic registration
To control the rollout of automatic registration of domain-joined computers with Azure AD, you have to deploy the Register domain-joined computers as devices Group Policy to the computers you want to register.
GPO to enable: Computer Configuration > Policies > Administrative Templates > Windows Components > Device Registration. Right-click Register domain joined computers as devices and “Enable” the policy.
During a reboot or a user’s sign in to Windows the device will be registered to Azure and written back to the On-Prem Active directory. You will not be able to see the device name in the dsa.msc. For that launch the Active Directory Administrative Center where you have an additional row of the devices “Display name”.

Step 6: Usage
When a user now logs in to his domain joined (or Azure AD joined) Windows 10 machine using his UPN, the user account is added to the users profile and visible under Settings – Accounts – Email & App accounts as a Work Account.

The user sync setting is enabled by default and users can change this options. Under Settings – Accounts – Sync your settings you will also recognize that the users UPN is used to sync all the settings.

Conclusion::
Try it out! You will recognize that settings are changed immediately. For example, change the wallpaper, the taskbar position or even Internet Explorer favorites. This is a great feature for roam user settings across enterprise devices. The next step will be to use conditional access for those users:
https://docs.microsoft.com/en-us/azure/active-directory/active-directory-conditional-access

Al, thanks for a great write up. I am interested in rolling out ERS for our managed clients. However, I have been searching for a way to address the following viable in roaming profiles, user data. Syncing profile settings is a great first step but do you know of a method or work around to allow for user data to sync to Azure and have it “rebuild” wherever they sign in using an Azure AD joined account?
LikeLike