Organize a Shared Mailbox and aliases using Inbox rules

Quickly configure and manage a shared mailbox using the Outlook for the Web or PowerShell.

Since several versions of Exchange Server and Office 365 you can use shared mailboxes to provide users access to a centralized mailbox.

In this quick post I would like to show how you can easily organize incoming emails if you also have configured different aliases for the shared mailbox.

Let’s say you have a shared mailbox called info@mydomain.com and you have configured several aliases like marketing@mydomain.com and events@mydomain.com.

From there you would like to move incoming mails directly to sub folders in your info@ mailbox. In a shared mailbox this is only possible using the message header. There are two ways to achieve this goal. First using Outlook / Outlook for the web and / or PowerShell. 

CONFIGURATION with Outlook for the Web

Make sure you have the right permissions to manage the mailbox and open the shared mailbox (link to how-to).

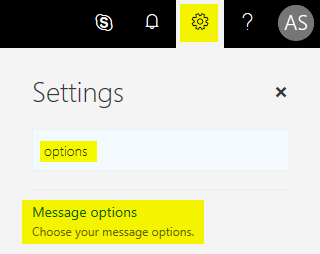
Select Settings search for options and choose Message options – Choose your message options

  • Select Inbox and sweep rules and create a new inbox rule
  • Give a Name to the rule. Browse to When the message arrives, and or matches all of these conditions – It includes these words – in the message header – type in your alias for the mailbox (alias@mydomain.com)
  • Browse the condition Do all of the following – Move the message to a folder… Select your folder where the message should be moved to
  • If needed select Stop processing more rules and save (OK) the rule
  • The final result should look like this:

CONFIGURATION with PowerShell

First connect to Exchange Online using PowerShell. If you’re not familiar with connecting to Exchange Online using PoSh. please refer to this link.

Set-ExecutionPolicy RemoteSigned
$UserCredential = Get-Credential
$Session = New-PSSession -ConfigurationName Microsoft.Exchange -ConnectionUri https://outlook.office365.com/powershell-liveid/ -Credential $UserCredential -Authentication Basic -AllowRedirection
Import-PSSession $Session -AllowClobber

If you like to add a new alias to your mailbox, you can use the Set-Mailbox cmdlet like this command:

 Set-Mailbox "info" -EmailAddresses @{add="alias@mydomain.com"}

Use the New-InboxRule cmdlet to organize the shared mailbox by adding new rules. Make sure the subfolders exist in the mailbox:

New-InboxRule -Name ""yourAlias"@mydomain.com - Move to "YourFolderName"" -Mailbox info -HeaderContainsWords "alias@mydomain.com" -MoveToFolder ":\Inbox\YourFolderName" -StopProcessingRules $false

There are much more settings to add. Feel free to post a comment to contribute this post!

First look at the new #OneDrive Admin Center (Preview)

The new OneDrive Admin Center Preview  is now available since a few days. During the past it was just a pain in the a** for admins to manage the OneDrive for Business settings. This has pretty changed a with the new portal which is not yet GA.

If your tenant already has been upgraded then you will be able to access your portal with a Global Admin account using the URL https://admin.onedrive.com

Let’s have a look on the settings.

Home Tab
The home tabs shows just the welcome message.

2017-01-09-11_38_02-onedrive-for-business-admin-preview-internet-explorer

Sharing Tab
On the sharing tab you find all the settings for sharing files outside of your organization. Let them share files outside the company using OneDrive or SharePoint, setting up sharing links, anonymous accces, limiting sharing to a sepzific domainand also what external users can do.

onedrive-for-business-admin-preview-sharing

Sync
The sync tab allows the admin to have control over the syncing settings. Also you have a link for downloading always the latest and newest OneDrive Client and another link to the support.office.com website to see the latest syncing issues.

Following options can be configured:

  • let users install the sync client from the OneDrive website
  • Allow syncing onlx PCs joined to specific domain
    • Enter a GUID for your domain(s)
  • Block syncing of specific file types
    • Enter file extentions you don’t want. For example mp3

onedrive-for-business-admin-preview-sync

Storage
Use the storage tab to configure the limits of the users storage. Default OneDrive value is 1024 MB. In here you can also set the retention time for accounts that have been marked as deleted.

Device Access
These settings applies to OneDrive an SharePoint.

  • Control Access based on a network location
    • Enter here your IP addresses or ranges for access to OneDrive. IPv4 & IPv6 is supported.
  • Mobile Application Management trough Intune is supported. You need an Intune license to use this option.

onedrive-for-business-admin-preview-intune

After assigning an Intune license to your GA Account you will be able to modify the settings for device management. This is an disadvantage in my point of view. It should be possible to change settings as admin without having any licenses applied.

Compliance
A few regulatory, legal and technical standards for OneDrive can be set here. This part helps to protect your data and preform security standard settings.

  • Auditing
    • View users activities related to OneDrive – deleted, shared, moved files
    • DLP – Data loss prevention, protect your organizations sensitive data
    • Configure retention policies
    • eDiscovery for emails, documents an Skype for Business conversations
    • Alerting, user and admin logs will be created

Note also the title of the page which gives you a hint to the Security and Compliance Center of Office 365.

I’m pretty sure that the new portal will be integrated into the Office 365 Admin Center. Until then, the admin portal is a good way to manage your OneDrive settings. Try it out today.


ConfigMgr 1606 – Configure Office 365 Client Agent Settings(Configuration Manager Current Branch)

Hi reader,

The newest Version of System Center Configuration Manager Current Branch (1606) is rolling out these days with a lot of new features and opportunities.

As the update is rolled out globally in the coming weeks, it will be automatically downloaded and you will be notified when it is ready to install from the “Updates and Servicing” node in your Configuration Manager console. If you can’t wait to try these new features, this PowerShell script can be used to ensure that you are in the first wave of customers getting the update.

Beginning in Configuration Manager version 1606, you can use the Configuration Manager client setting to manage the Office 365 client agent. Configure your Client Settings \ Software Updates Settings. There you can find now a new option called “Enable management of the Office 365 Client Agent“.

Capture

After you configure this setting and deploy Office 365 updates, the Configuration Manager client agent communicates with the Office 365 client agent to download Office 365 updates from a distribution point and install them. Configuration Manager takes inventory of Office 365 ProPlus Client settings.

Find more details on TechNet: https://technet.microsoft.com/en-us/library/mt741983.aspx

Deploy Skype for Business using Click-to-Run Tool and ConfigMgr 2012 R2

Hi folks,

Today I had to deploy Skype for Business for a Office 365 Business Premium Plan using ConfigMgr 2012 R2. This is a special O365 plan for a maximum of 300 users.

Normally with an E3 plan you can use a config.XML file with the lync product code entry called “LyncRetail”.

This is not working for all other plans like E1, E2, Business, BusinessPremium etc.! You have to change the product code to “LyncEntryRetail” otherwise you won’t be able to activate your Skype for Business installation.

This is how my config file now looks like:

<Configuration>

<Add OfficeClientEdition=”32″>
<Product ID=”O365BusinessRetail”>
<Language ID=”en-us” />
</Product>
<Product ID=”LyncEntryRetail”>
<Language ID=”en-us” />
</Product>
</Add>
<Update Enabled=”TRUE” />
<Display Level=”None” AcceptEULA=”TRUE” />
<Logging Name=”OfficeSetup.txt” Path=”%temp%” />

</Configuration>

Here you can find a list of all supported products: https://support.microsoft.com/en-us/kb/2842297


Maybe this helps.

Cheers,
Al